More of a visual learner?
Look closely! if a section has a video tutorial, it will have a link to that video next to the header!
Bridge and You!
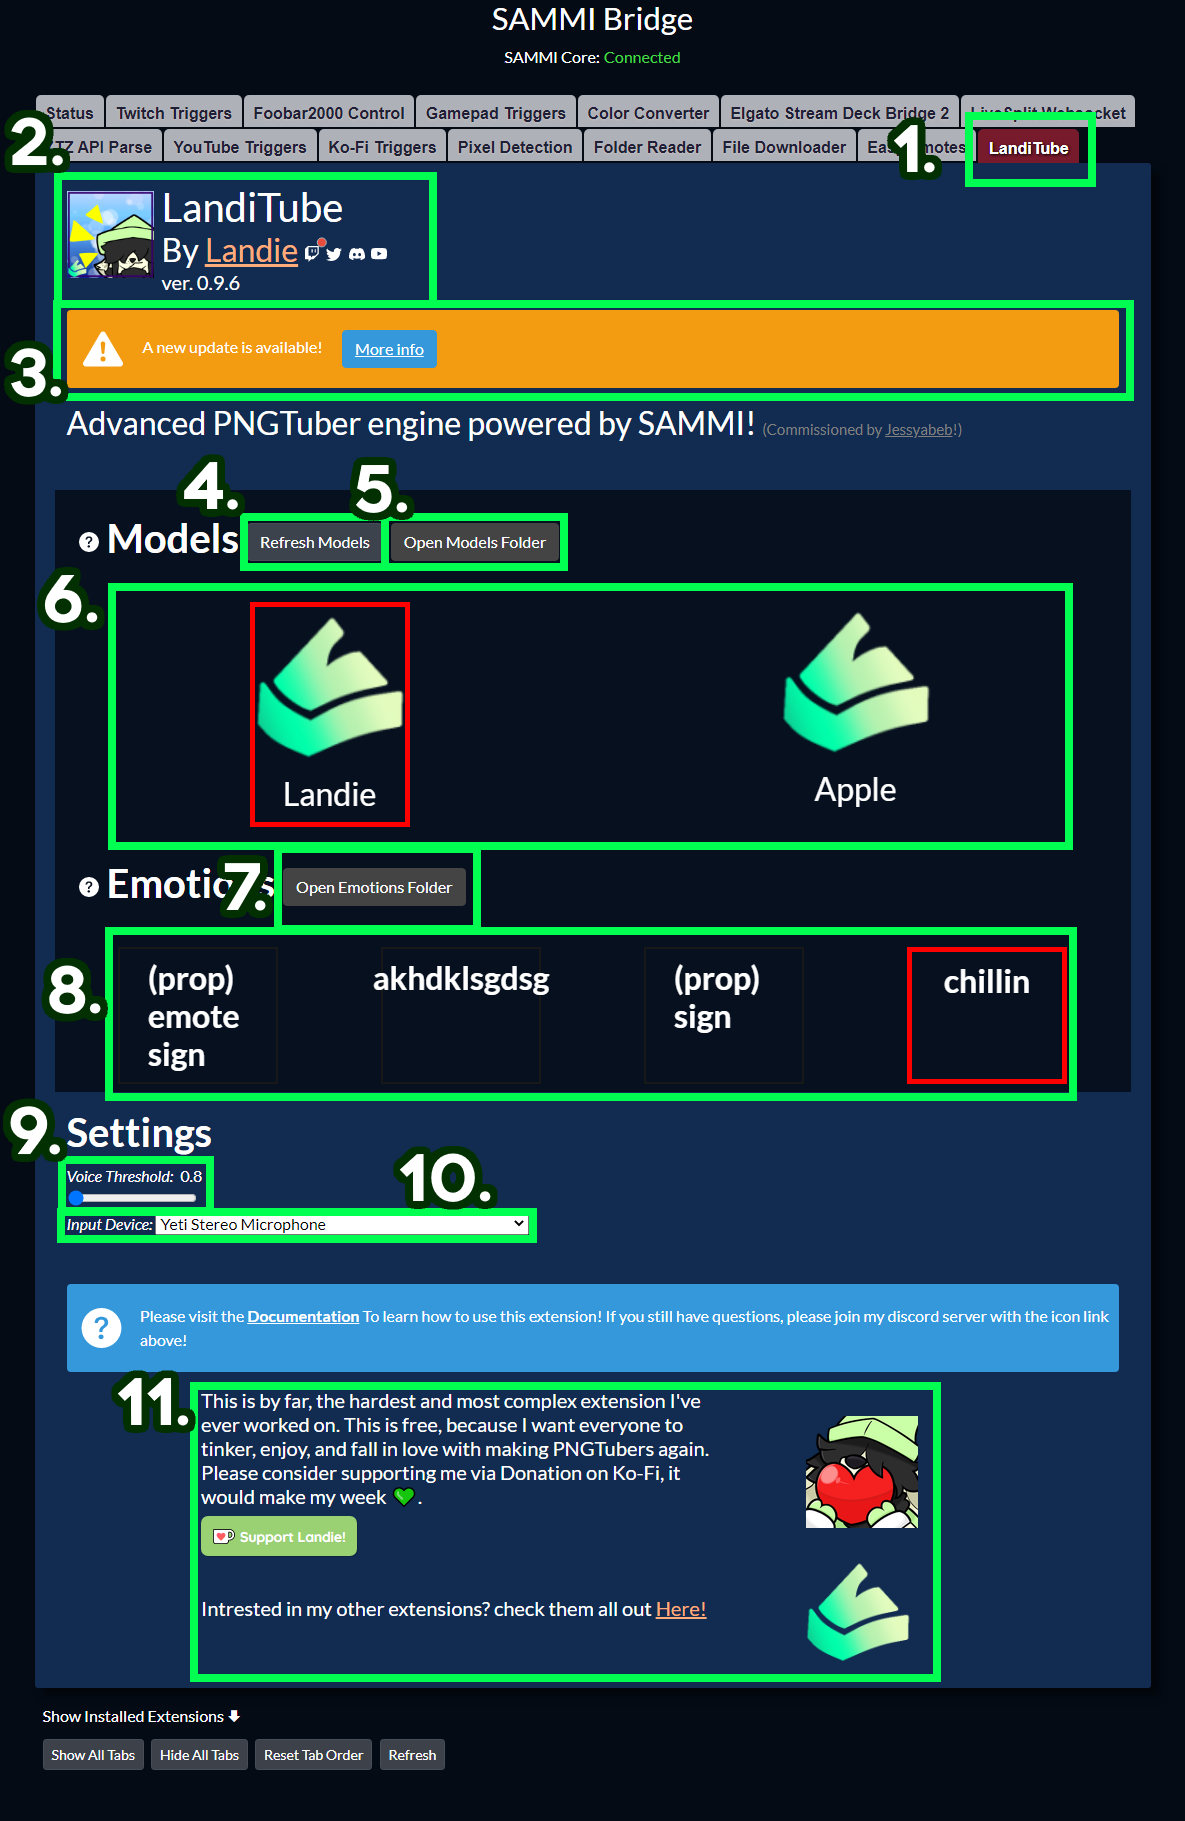
This is what your bridge will look like! lets run by section.
- "LandiTube" bridge tab. This is how you access the web interface for "LandiTube" after installing.
- Defining information about the extension, such as Title, Authors, and their socials. You can see if i'm live or not by the little red circle next to the twitch icon!
- Update banner, should only appear if there is a new update. Clicking the "More Info" button should reveal a modal with a little bit more information about what you'll be installing. Some have important warnings, so be sure to read!
- "Refresh Models" is a very important button to get familiar with. This refreshes the models, and their associated emotions. You should be clicking this everytime a model, emotion, or pose is added or removed. Changing an already existing pose should not require a refresh, but it's a good habit to have regardless!
- "Open Models Folder" is a quick and easy way to get to the folder where the models are stored. A file explorer window will pop up c:
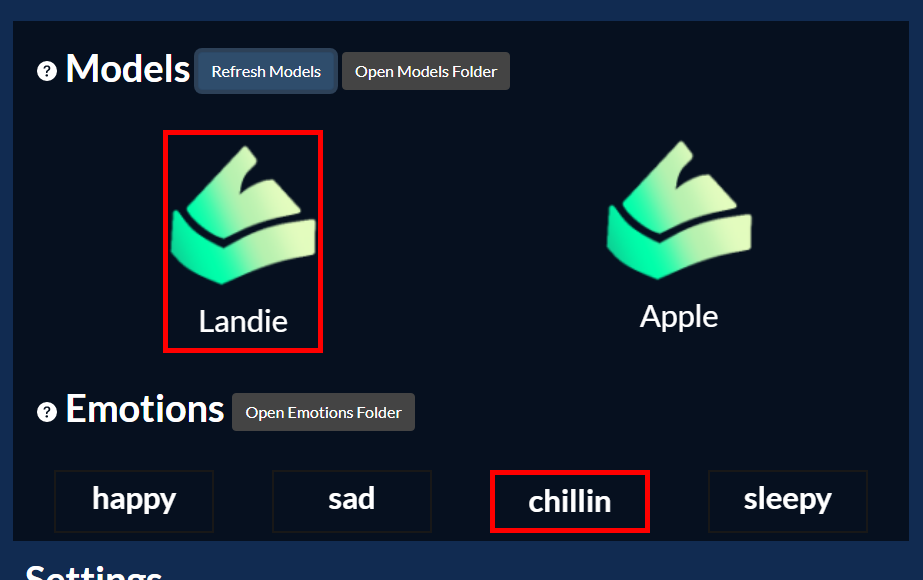
- This is the models list, all valid models will show up here. You are required to have at least one model loaded, and selected (depicted by the red box). Models have entirely different sets of emotions!
- "Open Emotions Folder" provides a quick way to get to the current model's emotions folder. A file explorer window will pop up c:
- This is the emotions list, which changes depending on which model is loaded. The emotions list will only load if there is a selected, active model. You are required to have at least one emotion loaded, and selected (depicted by the red box) for any output.
- "Voice Threshold" is the slider for detecting the sensitivity of your talking. This is a very sensitive slider, and I do not recommend going above 5!
- This allows you to set an input device to listen to for the engine to read. Great for if you're looking to use LandiTube as a TTS mascot, as you can set this to be a virtual audio cable! Make sure to pick the input that is right for you.
- Support footer, which has my donation info, and a direct link to my shop where I have even more extensions (that can interface with this one to create some incredible pngtuber combos!). I would really appreciate it if I could at least get a dollar every now and then 💚
Path Structure
Throughout this section, "LandiTube Path" refers to
(YOUR SAMMI INSTALLATION PATH HERE)\Landies_Extensions\LandiTube
"LandiTube" is built with ease in mind, as a result, all you have to do is make files and folders to create your models and emotions. There are some important notes to keep in mind while creating your directories.
To get a model up and running, You need to have 3 key components down. Models, Emotions, and Poses!
Make sure you've gone into your bridge, and changed the appropriate settings! you'll need to set your mic, maybe tweak the input threshold, etc. Bridge and You has an explanation of the settings section for you!
Models
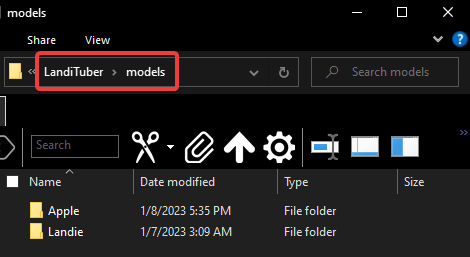
To create models, you create a folder in the "models" folder in the LandiTube path. All folders inside that folder will create an Icon in your bridge showing that a model is detected, and exists after a model refresh.
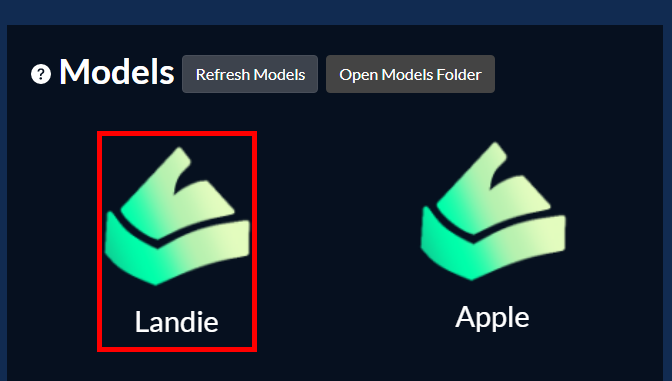
After adding a models folder, click the "Refresh Models" button in the bridge to check and see if an icon is generated in the bridge for you! Once you see your model, click on it! This will make the model active, which is required for output.
Here is a visual example of my models folder, where I have two models loaded, and one click on marking it active.
Emotions
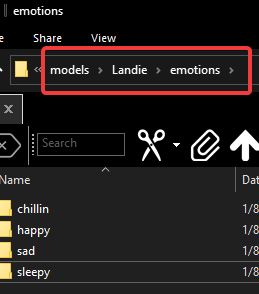
To create emotions for your model, you first need to specify an "emotions" folder in your unique model's folder. This is what it should look like:
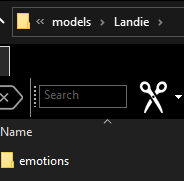
In total, your file path should look something like (LandiTube Path)\models\(unique model folder)\emotions!
Inside your new "emotions" folder, All folders created will create an Icon in your bridge showing that an emotion is detected, and exists after a model refresh.
After adding an emotion folder, click the "Refresh Models" button in the bridge to check and see if an icon is generated in the bridge for you under your active model! Once you see your emotion, click on it! This will make the emotion active, which is required for output.
Here are some emotions i made in my "emotions" folder inside the "Landie" model folder.
Poses
Now that your model is set up with proper emotions, lets get to the good stuff!
In traditional PNGTubing engines, you had 4 poses per emotion: idle, idle with blink, talking and talking with blink (sometimes you dont even have the blink).
in "LandiTube", you're allowed to have as many idle, talking, and other various poses LandiTube supports as your heart desires. Blinking will be discussed further down.
What does that mean? Well, everytime you would go into any of the states mentioned above, it would pick randomly between all of the provided poses. Example: You can have multiple talking poses for a single expression to really show natural movement, combined with multiple idle poses!
All poses are places inside one of your unique model's unique emotion folders!
NOTE: You are not required to include multiple poses of each state, or add blink frames for them. the option is just available to you!
lets go over how to set up each state LandiTube provides out of the box!
Idling
To create an idle pose for your tuber's emotion, drag in an image file with the keyword "idle" in it's filename!
For every image containing the keyword "idle" in it's file name inside your emotion folder, those images will be turned into a list of random poses for "LandiTube" to swap to whenever idling is supposed to occur.
Example: Lets make three idle poses for an emotion!
- Have three idle image files ready! animated or not, its okay! make sure each idle image file contains the word "idle" in there at least once! my files are named
"idle.png","idle2.png", and"idle3.png"respectively.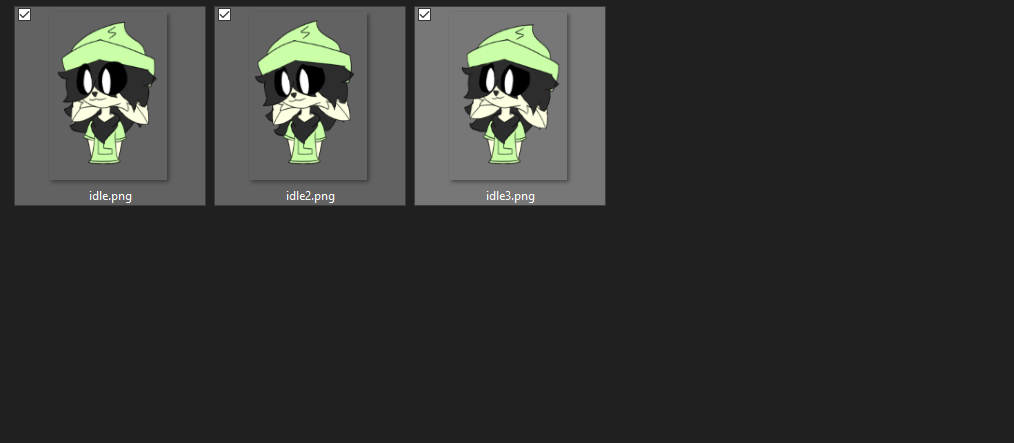
- Hit "Refresh Models" in your bridge! This should recalculate all the poses you have.
- Now, whenever you finish talking, It will pick any out of the idle poses provided!

Hmm. That doesn't look great. Lets look into adding some talking poses!
Talking
Talking is the easiest to do!
To create a talking pose for your emotion, drag in an image file named whatever you want! be sure not to include the keywords "idle".
For every randomly named image inside your emotion folder, those images will be turned into a list of random poses for "LandiTube" to swap to whenever talking is detected.
Example: Lets make two talking poses for my PNGTuber to pick from!
- Have two talking image files ready! animated or not, its okay! Ive named my talking poses
"one paw talkin.png", and"two paws talkin.png".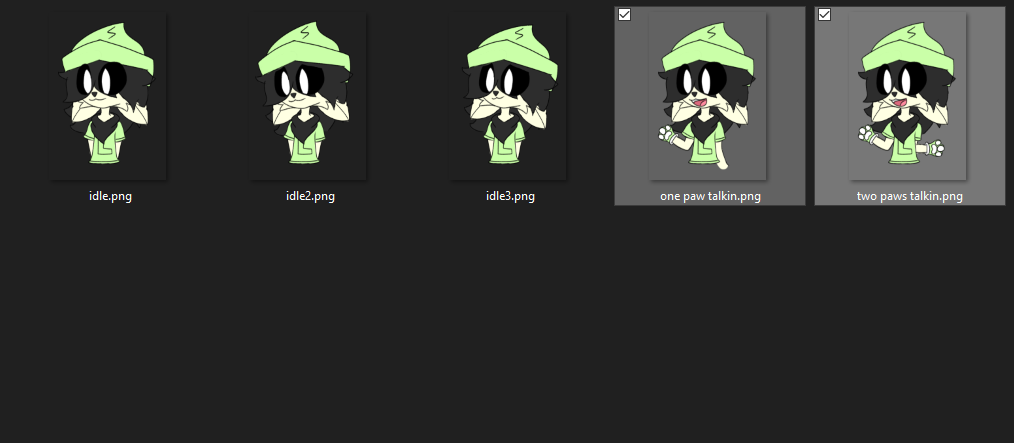
- Hit "Refresh Models" in your bridge! This should recalculate all the poses you have.
- Now, whenever you talk, It will pick either one, or the other!

Looks much better! but there is quite a dead stare.. lets add blinking!
Blinking
Talking, and idle poses do not need to have blinking frames, but they are nice! One nice feature is that blinking is not "all or nothing", you can set blink frames for whatever poses you want!
Maybe one idle pose is meant to be a dead stare while the other idle poses have blinks?
Maybe a character is angry and they don't blink while talking?
To attach blinking frames to your poses, all you have to do is drag in your blinking image with the exact file name of the pose you want to give blinking to, but with "_blink" appended just before the file extension (.png, .gif)
So "idle.png" becomes "idle_blink.png", "one paw talkin.png" becomes "one paw talkin_blink.png", etc.
Example: Lets add blinking frames to all of our inserted idle, and talking poses!
- Have your blinking image files ready! animated or not, its okay! every image is the same as the other images inside the emotion's folder, but with "_blink" added. Image below!
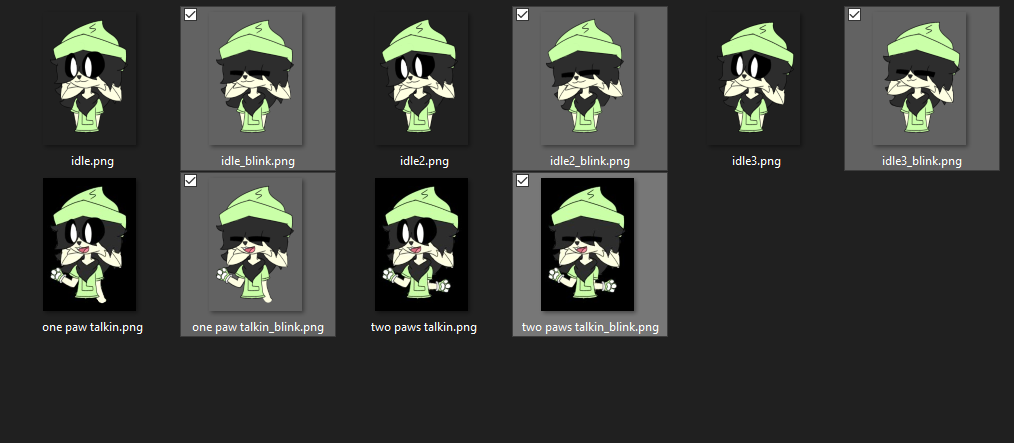
- Refresh is not needed for blinks! at least i think so. if you see an issue, just hit "Refresh Models"!
- Now, every pose has blinks!

Yelling
Yelling frames are a feature added in 0.14.6 and above, allowing you to specify an extra talking frame that triggers when your voice reaches a higher threshold. You can set this threshold in the settings tab!
The threshold should always be above the talk threshold! Just like the talk threshold, the yelling threshold is sensitive, so keep the number low!
Yell frames are attatched to any talking pose, sort of like how blink frames work!
To attach yelling frames to your poses, all you have to do is drag in your yelling image with the exact file name of the pose you want to give yelling to, but with "_yell" appended just before the file extension (.png, .gif)
So "talking fella.png" becomes "talking fella*yell.png", "mumble.png" becomes "mumble_yell.png", etc.
📝 Example: Let's add yelling frames for all of my talking poses in an emotion!
This emotion only has one talking pose and one talking pose with a blink frame, so I'm providing two yelling frames for each one.
- Gather all of your yelling frames! png, gif, mp4, webm, you name it! You don't need to have a yell frame for every single talking pose, just apply them to the poses you want!
- ensure the files are named accordingly. For me, I have one talking pose "talk.png", as well as one with a blink frame attatched, "talk_blink.png". I want both of these to have a yell frame!
"talk.png" becomes "talk_yell.png"
and
"talk_blink.png" becomes "talk_yell_blink.png" - drag the images into my model's unique emotion folder!
- click "Refresh Models", bam yelling frames.
Transitions
New as of 0.20, the Transitions module allow you to set intermediary poses between emotions! These can either be single image files, or .gif files!
if you scroll down in the LandiTube tab in the Bridge, you will find a "Transitions" dropdown. If you click the arrow, you can see all of your transitions!
Global transitions are played whenever you swap emotions! These do not take into account what emotion you are on and are general purpose

Dynamic transitions are played whenever you swap emotions, however, these are influenced by the emotions you are switching from and to. You can set a image file or gif for an intro animation, and outro animation. This allows dynamically generated transitions that flow smoothly between your emotions!
Example concepts:
Outros:
- Crying emotion with outro of wiping tears
- Sign emotion, holding a sign with a logo or phase with outro of spinning it and putting it behind your back
- Thinking emotion with an outro of a "eureka" moment
COMBINED WITH
Intros:
- Notepad emotion with an intro of pulling out a notepad
- Hungry emotion with an intro of a pained hunger hunch
- Celebration emotion with an intro of one big hyped jump
With all these outros and intros, you can generate 9 different dynamic transitions!
Example: Swapping emotions from Thinking to Notepad. Thinking emotion, with an outro of a "eureka" moment, and intro of pulling out a notepad, then writing things down.

You can have both global and dynamic transitions at the same time! great for if you dont have intros and outros made for every emotion!

Setup
to begin using transitions, we need to make a transitions folder in our unique model's folder. This should be next to your emotions folder, like so!

Global Transitions
Inside your transitions folder is where you place any image or gif files you want your model to randomly cycle through when changing from one emotion to the other!
You can put as many transitions as you want, they will be randomly cycled through!

and done! clicking "Refresh Models" in the bridge under the LandiTube tab will load those transitions into OBS and be recognized for usage!
(yeah, its that easy!)

This looks... okay... needs to be a bit faster.
You might want some extra customization for your single image files, like how long you want the transition to hold for. thankfully, all you have to do is create a .fenc file next to your transition image with the same name, and it will act as a configuration for that specific transition! .fenc files can easily be created by first creating a .txt text file through the right click menu, then renaming the file extension to .fenc.

open the .fenc file with your favorite text editor, and lets go over how this is written!
the name of the option you want to edit is first, so in my case im starting with duration, then you type =, and lastly you type the value. For example, changing the duration property to last 400 milliseconds looks like this: duration=400
every newline is another option!

here are the list of options you can change for single image transitions:
| Options | Description | type | Example |
|---|---|---|---|
duration |
Change how long you want the duration to last on screen for in milliseconds! | Number | duration=350 |
now, hitting refresh gives us...

so much better!
...but we can make it even better.
Dynamic Transitions
Dynamic transitions are way cooler and will for sure wow your audience!! Dynamic transitions allow what are known as intro animations, and outro animations which play based on the current, and next emotion.
Here is a helpful diagram showcasing the power of this system (read left to right):

Red: Current Emotion (exiting)
Blue: New Emotion (entering)
Yellow: Transition
Here, we can see that we can connect unique animations when we exit our current emotion, and enter our new emotion. With this in mind, we create an entirely unique transition which gets generated from your current emotion outro, and your new emotion intro.
Taking a look at the global transition in the top half of the diagram, you can see that the transition is not connected or influenced by our emotions in any way.

Notice how my character shakes their head before pulling out a notepad and writing on it.
the character will shake their head whenever exiting the angry emotion, as its unique to that emotion.
pulling out the notepad will occur whenever entering the notepad emotion.
Now with that explained... lets add some!
Since dynamic transitions are tied to emotions, we need to make folders in the transitions folder that are the exact names of our emotions!
I'm going to add an outro animation to my angry emotion, and an intro animation to my notepad prop emotion, so i need to make folders that I can put those into!

Seem familiar? It should! This is exactly what you did back when you were adding emotions! make sure the names match one-to-one!
Let's enter an emotion's transition folder to edit first. I'll go with the angry emotion!
Alright, how do we set the intro and outro animations to our emotion?
Outro Animations
Outro animations are played whenever you are leaving your current emotion for a new one.
To add an outro animation, drag your image file or gif file (can be named anything!) into the folder, and add _out at the end of it, before the file extension.
Example: shakehead.gif becomes shakehead_out.gif

Click "Refresh Models", and check your Transitions list! you should see a new outro animation set for your emotion.
Your outro will always play, even if the new emotion you are swapping to doesnt have an intro! its better than having a global transition thats for sure :P
Intro Animations
Intro animations are played whenever you are entering your new emotion from your current one.
To add an intro animation, drag your image file or gif file (can be named anything!) into the folder, and add _in at the end of it, before the file extension.
Example: fetchnotepad.gif becomes fetchnotepad_in.gif

Click "Refresh Models", and check your Transitions list! you should see a new intro animation set for your emotion.
Your intro will always play, even if the current emotion you are swapping away from doesnt have an outro! its better than having a global transition thats for sure :P
Config
If you dont use gif files and use png files, you can add a .fenc just like you can for global single frame transitions, check there to figure out how to do it for your dynamic transitions! Options are the same.
Extra notes
- Of course, you can have an intro and outro in one emotion. In fact, you can have many intros and outros in an emotion! LandiTube will randomly pick for you.

Attitudes
New as of 0.21, Attitudes are movements you can add to your tuber based on what model, emotion or even specific pose you are on! Attitudes can also be customized to form your own presets. More on that later.
Types
There are the current attitudes to choose from:
- Jam
- Sway
- Bounce
- Shake
- Prance
Application
Let's start simple. Let's apply an attitude to an entire model!
To apply an attitude to a model, simply open your models folder, and pick the name of the model you want to give the attitude to. Let's use my Landie model and give them the Sway attitude. This should give them a nice natural swaying motion. Create a .fenc Configuration File if you haven't already, and add in the line attitude=sway. Now, once you save and refresh your models in the LandiTube bridge, look at that! Landie now has a sway that occurs across all of their emotions, and the poses that follow!
That's great and all, but what if I want my angry emotion to shake when it's active? Not a problem at all! We can do the exact same procedure, we just have to navigate to where our emotion is stored inside our model.
Here is angry! In your .fenc Configuration File, and add in the line attitude=shake, and now whenever this emotion is active after refreshing, it will swap to them seething with rage, showing their true volitile nature.
But wait, didn't we just set an attitude on the model? The sway one? what happens to that?
Well... nothing! It's still there! if we swap to any other emotion, we get our sway back! How is that determined?
Attitudes operate on a hiearchy. All this means is that the more specific the attitude, the higher priority it gets. Here is a chart to better illustrate what this looks like!
We can see from this chart, that Poses have the highest priority. Knowing this, no matter if we have an attitude on the emotion it's a part of, or the entire model, if an attitude exists for a pose it will always pick that one first. Let's add one!
I want it so when I yell with my notepad emotion, Landie does a little prance. Only yelling, not regular talking! That should be easy! going inside the notepad emotion, there we can find our yell pose. You know the drill by now! In your .fenc Configuration File for the pose, and add in the line attitude=prance!
now when i YEEEEELLLLL! i do a little jig! and when I am on any other pose such as idle, talking, blinking, and other poses, it actually goes back to the sway attitude we set all the way back in step 1, because that is applied to the model itself! So cool!
Attitude Editing
Do you wish that the shake attitude could be MORE violent? maybe the sway should move around less? do you wish that I didn't suck at designing attitudes to perfectly fit your tuber's style? I hope not that last part...
...but I CAN give you the tools to do it yourself!!
Say hello to the Attitude Maker, a way of customizing attitudes! In the SAMMI Bridge with all of the LandiTube options, you should see a tab that is called "Attitude Maker". This is where you will manage anything custom with your attitudes! There is a Simple, and Advanced mode (which is not out at the time of writing).
Simple Mode
In simple mode is where you can customize existing Attitudes and save them as Attitude Presets via editing some provided parameters for use in your .fenc Configuration Files! To create a preset, while in simple mode of the attitude maker, click on the drop down to select an attitude! I'll be editing the "Shake" attitude so I can make it more violent than the default preset.
Once selected, you might notice everything is greyed out. Don't worry, this is normal! You cannot edit default presets, and have to instead build off of them, so click "New Preset"! Once you do, you'll be asked to verify, then name the preset.
Presets should only be named with a single word and no symbols. This may change in the future.
I'm going to call my preset "fast"!
After confirming your new preset, you will need to re-select your attitude, but now you should be able to pick a new preset for the attitude, being the one you just made.
The parameters should no longer be grey, and you can try messing with them to get a desired effect! A description of each parameter can be seen by hovering over the question mark next to them.
I'm going for a really fast, exaggerated shake. I think this looks ok!
Your changes should be visible on your tuber! Once you get it how you want it, click the green floppy disk icon to save! This is required in order for your preset to not glitch out at random.
Let's apply this new preset we made! Presets can be applied in any place you can apply attitudes to, it's just an extra line to specify which preset to use! Can't remember how to apply an attitude? re-read the attitude section!
I'll add the shake attitude to my angry emotion's "Yell" pose with attitude=shake. This by default as we know, adds the shake attitude, but when you don't specify a preset, it uses the default one. Adding a new line to our fenc file, attitude_preset=fast, will use our "fast" preset we made earlier we made on the shake attitude. Make sure that when applying a preset, it's also the correct matching attitude that you made the preset on!
Our fenc file now has two lines, attitude=shake to specify the attitude, and attitude_preset=fast to specify the preset to use!
now when i YELL on my angry emotion, I shake more!! since I have the default shake attitude applied to the entire angry emotion, whenever I'm not yelling it does the regular shake. Yay!
Advanced Mode
(Not out yet)
Layers
When you create a LandiTube model, you draw poses and frames! But what if you want to give your model a prop, such as...
- A hat that follows your model's head movement?
- A handheld item (pen, drink, food) that follows your model's hand movement?
- Clothing that has various moving parts?
Sounds like a pain in the ASS to re-draw All of your poses just to have one prop, then create a whole separate Emotion to toggle to, right??
This is where layers step in!
Layers, introduced in 0.20, are used to dynamically change what is displayed in front of or behind your model based on its active pose, without directly changing the model itself!
The way this is accomplished is by generating a source which acts as a freely-transformable reference of an OBS Scene that you can align wherever you want per pose. It's not as complex as you think!
Head on over to the "Layers" tab in the bridge so we can try it out!

You should have two layers available to you (for now), Front layer, and Back Layer. In order to use these we first need to create an OBS Scene for the layers to reference, so lets go into OBS and create a new scene.
I'll call mine "Hats"!
After doing so, lets add an image of a cute hat using an Image Source! I'll align my hat to the center of the scene.

Back in the bridge, lets set our front layer to the scene "Hats". and see what happens!

Woah, thats weird lookin.
What happened, is it has merged [LandiTube], and the Hats scene together, and it doesn't look so great! lets tweak it!
In OBS, if we go into the [LandiTube] Layers (Front) scene, we'll see a source for every pose and frame we have loaded into LandiTube. Pretty funky names!

Each of these sources are referencing our Hats scene, and we can freely move these sources as we please! each source is attatched to a pose, meaning that when poses change, the sources toggle themselves too depending on what pose you're on!
We can transform each individual source however we want per loaded pose!

We have a bit of a problem though. We can't see our model, how the heck are we supposed to align these sources properly??
To see your model and transform the sources in the layer scene at the same time, right click the [LandiTube] Customize scene and click "Windowed Projector (Scene)". This will pop out a window of this scene, which contains your model, plus it's layers without the squishiness so you can align your sources easier!
Right click the window and click "Always On Top" so the window will always be visible while editing in OBS.

Cool! we can head back to [LandiTube] Layers (Front) and start messing with our sources and see our model at the same time for alignments. But there is another issue!
It's really hard to align some poses like ones with blink frames attatched, because they are only a split second long!
I also have trouble selecting the source I actually want to edit and i keep grabbing all the other ones!
This can all be fixed by using the Pose Selector!
In the bridge under the "Layers" tab, towards the bottom there is a "Pose Selector" section!
In here, you can click on any pose loaded for your model which will freeze the engine and allow you to take your time aligning your sources, as well as making sure only the corresponding source in the layers scene is able to be transformed.

So much better! So far, everything is going well! We can see our model while moving around sources in our layers scene, we can freeze the engine to take our time aligning our sources on a specific pose, and fix the issue of selecting unrelated sources! Let's start aligning some sources!
You can crop, squish, stretch, rotate, do anything you want to these sources to fit them just how you like, to your model! Go nuts!
You may encounter one final hiccup however... what if two poses don't have any extra movement in a specific area?? Do I have to manually try to align them perfectly?

No!
You can copy and paste transformations between sources in OBS! right click the source you want to copy all of the transformation properties from, and click Transform > Copy Transform. from there, right click the source that you want to have the exact same transformation, and click Transform > Paste Transform. Perfect! Now they are perfectly aligned, no jitter!

Here are some pro tips to transform sources easier in OBS:
- Use the ARROW keys to nudge sources by the pixel, and hold SHIFT to move in 5 pixel increments.
- Hold the CONTROL key while dragging, or rotating to disable source snapping to avoid having your sources snap places you don't want them!
- Holding the SHIFT key while rotating will snap the source rotation by 15 degree increments!
- Hold the Left ALT key while dragging a side to easily crop a source (this is highly not recommended when transforming sources in a layers scene)
- Use filters! each source clone is independant of each other, so you can add a filter like 3D Effect by Exeldro to move a source in a 3d space, or add a user-defined shader with the automatically installed obs-shaderfilter fork by Exeldro and use the
corner-pin.shaderfile to map corners of a source to different coordinates. Play around! have fun!
With this knowledge, you should be a pro at aligning all of these sources just the way you want them on your model! 
When finished with your layer, click Resume Engine in the "Layers" tab of your bridge, otherwise your model will appear frozen when trying to get it to talk!

Okay Landie, I did all of that work and I have a hat that perfectly aligns to my head. What is the benefit of this again??
Keeping the [LandiTube] Customize scene in a window projector, heading over to the Hats scene (the scene all of our sources in our layer scene are referencing), swap the image!

As you can see, its now incredibly easy to swap out this hat for any image we want and have it already apply all the transformations needed to align to our model! make it a gif, or a png!
But this is an entire scene we are working with in OBS.
we have All types of sources available to us, not just Image sources!
Get wild! Use a media source, a display capture, maybe a browser source for friends in a discord call to sit on your head, sky's the limit!

Combining this capability with the limitless functionality of SAMMI will allow you to have your viewers change various aspects of your layers, making your stream the most unique out there!
- Twitch channel point redeems to change hats, glasses, held objects
- Rotate a source around whenever you speak, for maybe tails?
Anything you could imagine!
Please check out the Tutorials section of the site to look at a couple of step-by-step guides on how to capitalize on the functionality of layers using SAMMI, and the LandiTube API!!
Dynamic Lighting
NEW as of 0.20, LandiTube gets dynamic lighting natively built in!
This component boasts features such as:
- Base lighting around the whole model
- Auto generated rim lighting around the model, which can be moved in real time
- Applies to any layers and/or custom sources in
[LandiTube] Customize
A new tab "Dynamic Lighting" has been added to your bridge, allowing you configure how you want it!
To begin, you first need to make sure you have a scene that ONLY contains the sources you are capturing in OBS and intend to have dynamic lighting for.
What this means, is that you need a single scene to contain all of your game captures, display captures, capture cards, whatever you're using! This can be seen as a utility scene.

Create a new scene, and add all of your favorite captures in there! Then, import this scene into all of the scenes where you want your gameplay to show up.
Not only is this needed for dynamic lighting to work, but it is much more tidy for your stream setup, so thank me later!


Now you're ready!
In the bridge, click the "Dynamic Lighting" tab and set your light source to your scene full of your game/application captures.
Congrats! you now have a light source. Enable "Backlight" to check it out!

Backlight
Backlight is the most basic form of dynamic lighting. This applies to your entire model, and can be as influencial as you want on your model.
Options
The Brightness slider impacts how much of the colored light is applied to your model!
The Saturation slider impacts how colorful the light is on your model. if colors feel too washed out to your liking, or too overpowering and not accurate to the display, tweak it here!
Rimlight
Rimlight is an extra, high intensity lighting layer applied ontop of your model which is auto generated.
Options
The X and Y Position sliders allow you to nudge the projection of the rimlight to change the direction it approaches from!
The Opacity slider impacts how much of the rimlight is visible on your model.
The Feathering slider impacts the radius of the rimlight. If you want it softer and less sharp, add more feathering! if you want it cartoonish and sharp to the model, reduce it!
.fenc Files
In LandiTube exists a special configuration file type that can be created and applied to different components of LandiTube. This filetype, is known as a .fenc file! .fenc files are meant to attatch to models, emotions, transitions, and even specific poses, in order to add additional rules and behaviors to the way they function.
If there is a setting I wanted to apply to my model for example, I would go to my models folder, and right next to my model folder, I'd add a .fenc file of the same name. so adding a .fenc file to my "Landie" model would look like Landie.fenc (casing matters!)

To edit a .fenc file, open it and if it prompts you to choose an application, choose "Notepad". If you do not see the notepad option, click "More Apps" and scroll down until you see it.
fenc files operate on "key value pairs", with the = sign being the separator. What this means is, the name of the option goes first, then an = sign, then the value of said option.
Options are separated by a newline, so a typical fenc file could look something like this:

This example shows that we are applying an attitude to this model, and that attitude is "shake". we are also applying the "slow" preset that is custom made by the user.
SAMMI Integration
LandiTube is made using the amazing stream assistant program, SAMMI! SAMMI allows you to easily make your dream stream projects come true without needing to learn how to code. I know I sure made my dream project... LandiTube!
Because of LandiTube being made directly in SAMMI, you have a lot available for you to mess around with to make custom interactions that LandiTube doesn't officially support!
You can learn more about how to use SAMMI from my simple Tutorial Series, or our official documentation, Here!
You can also jump right into LandiTube-specific SAMMI tutorials so you can better get an understanding of SAMMI's workflow, and how easy it is to use it to really make your LandiTuber stand out more than it already does!
Commands
Commands are the building blocks of SAMMI, the main logic you implement! Here are some LandiTube specific commands available to you:
LandiTube: Change Model
Changes the current model to another valid model!
| Box Name | Type | required? | Description |
|---|---|---|---|
| Model Name | Dropdown | ✔ | The name of the model you wish to swap to. (casing matters!) |
LandiTube: Change Emotion
Changes the current model's emotion to another valid emotion!
| Box Name | Type | required? | Description |
|---|---|---|---|
| Model Name | Dropdown | ✔ | The name of the emotion you wish to swap to. (casing matters!) |
LandiTube: Pause Engine
Pauses all actions of the engine, leaving your character stuck in stasis. poor lad!
| Box Name | Type | required? | Description |
|---|---|---|---|
| Reset Squish | boolean (checkbox) | ✔ | If ticked, after executing the command, the engine will stop and the proportions wil |
LandiTube: Resume Engine
Resumes default engine behavior c: For use after previously pausing the engine! otherwise this command is just a fun paperweight in digital form~
Extension Triggers
Extension triggers are a way for a SAMMI button, a executable container to run your commands, to be ran based on certain criteria specified by the Engine. This works exactly like if your button is set up to trigger on twitch chat. You can read more about extension triggers and SAMMI here.
Currently, there exist these Extension Triggers:
| Extension Trigger | Description |
|---|---|
LandiTube talking true |
triggers a button when the character starts talking |
LandiTube talking false |
triggers a button when the character is finished talking |
LandiTube blinking true |
triggers a button when the character blinks |
LandiTube blinking false |
triggers a button when the character is done blinking |
LandiTube yelling true |
triggers a button when the character yells |
LandiTube yelling false |
triggers a button when the character is done yelling |
LandiTube model changed |
triggers a button when the model is changed from the current active model |
LandiTube model (modelname) |
triggers a button when the model is changed and matches a specific model |
LandiTube emotion changed |
triggers a button when the emotion is changed from the current active emotion |
LandiTube emotion (emotionname) |
triggers a button when the emotion is changed and matches a specific emotion |
LandiTube attitude changed |
triggers a button when the attitude is changed. Version 0.21.0^ |
LandiTube attitude (attitude name) |
triggers a button when the attitude is changed. Version 0.21.0^ |
LandiTube attitude_preset changed |
triggers a button when the attitude preset is changed. Version 0.21.0^ |
LandiTube attitude_preset (attitude preset name) |
triggers a button when the attitude preset is changed. Version 0.21.0^ |
Each extension trigger returns the same hefty amount of juicy data when that extension trigger was sent for you to read and tinker with.
You can pull these values using the command "Trigger Pull Data" on a button that was triggered with one of these Extension Triggers mentioned above.
Here are the list of fields you can enter in the Pull Value box:
| Pull Value | Type | Description |
|---|---|---|
blink |
boolean | Current blinking state |
current_emotion |
string | The current set expression of the active model |
current_emotion_path |
string | the current image path compiled together using global.main_directory, current_model, current_state, and current_emotion_state_extension |
current_emotion_poses_idle |
Array | An Array of the current model's idle poses (not including blinks) |
current_emotion_poses_talking |
Array | An Array of the current model's talking poses (not including blinks) |
current_emotion_state_extension |
string | The current state's file extension to be used in conjunction with current_state to create a full file |
current_model |
string | The current active model |
current_state |
string | The current active state of the model. This the result of various impacting factors such as yelling, blinking, talking, and randomly drawn poses |
current_state_has_blink |
boolean | If your state has the ability to blink or not! Version 0.13.2^ |
current_attitude |
string | The current attitude applied to a state. Version 0.21.0^ |
current_attitude_preset |
string | The current attitude preset applied to a state. Version 0.21.0^ |
talking |
boolean | Current talking state |
yelling |
boolean | Current yelling state |
Global "LandiTube" Object
Need to fetch the current emotion of a model but not based off when an event fires? for example, if you need to store the current emotion to go back to after you run a channel point reward that changes the emotion to something else temporarily?
Enter, the global LandiTube object!
All this is, is a 100% always accessible set of data that is the same as the provided data in Extension Triggers, so, look there for a list of all the things you can pull from there! In the future, there will be more unique things to this object that can't be returned in Extension Triggers.